Unlike extract beers, which you do a partial boil and then top-up with water, AG requires you to boil your full volume of wort. Taking evaporation into consideration, a full boil for a five gallon batch of beer will start off with at least 6 gallons of liquid. This larger volume of wort causes an instant need for equipment that you may not own, since it was not needed in extract brewing, such as a larger brew kettle and a way to cool 5 gallons boiling liquid. AG brewing also requires you to mash grains which involves holding the water and grain at a constant temperature for about an hour.
Part 2 - All Grain Brewing Needs
Larger Brewing Vessel - To boil 6+ gallons of wort you will need a brew kettle large enough handle that volume of liquid. I recommend at least an 8 gallon capacity for 5 gallon batches, and to buy the largest pot you can afford at the time. There is always some debate between aluminum vs stainless steel, but I will let you figure that out. I have a 15 gallon aluminum pot. Here are some of your options:
- Turkey Frying pot - These pots generally come in 7.5 gallon volumes and are adequate for full boils of 5 gallon batches. ~$50 on Amazon
- Tamale Pot - Some International food stores sell these 32 qt (8 gallon) pots for $30-$40. I have seen them at a local Shoppers Food Warehouse
- Restaurant Supply - Restaurant supply stores will carry a wide variety and size stockpots in aluminum or stainless steel. This is the route I went and I purchased through the online vendor Instawares.com. Price varies on size ~$75 for a 10 gallon and ~$90 for a 15 gallon aluminum pot.
- Keggle - Legally obtained decommissioned 1/2 Barrel Kegs can be used as brew kettles. All you need is the right tools and a little DIY to cut to top off. Price can range from free to $100 or so.
- Dedicated Brew Kettle - These kettles are generally sold by your Local Home Brew Shop. They are made of stainless steel and come with ball valves and thermometers attached. They range from about $200-$400 depending on size.
- Smaller Batch - Looking to go AG on the cheap? Don't scale up your brewpot, scale down your batch size! If you already have a 5 gallon pot you can easily make 2.5-3 gallon all grain batches!

(Me with my 15 gallon brewpot)
Boil, Bringing the Heat - So unless you opted for the "Smaller Batch" option on the kettle size, you will need to be able to bring your 6+ gallons of wort to a boil. Most household stovetops do not contain the power to do this. You will need to invest in a new, or additional heat source:
- Turkey Fryer - This can be purchased in combination with the Turkey Fryer pot Listed above! This purchase is best made in the days AFTER Thanksgiving when they can be found on sale. Be careful though - many turkey fryer burners have safety timers that will turn off the burner 15 minutes or so after use and can be a real pain! ~$50
- Stand-a-lone Propane Burner - Similar to the Turkey Fryer Burner, but purchased separately and without a safety switch. Do a google search on Bayou burners and you will find a lot of good products. I went with a Bayou SP-10. Caveat: make sure your pot will sit on the burner stand. Some pots, like keggles, don't have a fully flat bottom and don't sit nicely on some burners. If this is the case check out the solution over on Hopped Up Brewer ~$50-$100
- Electricity - Brewers weld low density heating elements to their pots or stick hit sticks into their pots. If you go this route make sure you KNOW what you are doing as electricity can kill you if you don't know what you're doing. Check out the heatstick which can be used as a supplement with your stovetop. Price can be ~$50+
- Natural Gas - There are special burner heads and adapters to convert or build a natural gas burner. price can vary greatly
Mashing Vessel - to conduct the mash you need a way to hold the grain and water at a constant temperature for about an hour. You will additionally need to create a method that will allow you to drain the liquid, but leave the grain. I won't cover these devices, but they can be had for $10 - $20+ depending on your chosen method.
- Brew in a Bag - The Brew in a Bag method has picked up a lot of steam in the past couple of years. It makes sense since the only additional piece of equipment is the bag itself (disregard that $10+ requirement above). Read more about BIAB and see if its for you! $5 - $35
- Beverage Cooler - Beverage coolers aren't just for keeping beverages cold, they are insulated vessels and they can retain heat just as well. You can get differnet size coolers which will determine the gravity of beers you can produce. Somewhere around 10 gallon is an average size for most 5 gallon batches. ~$30-$50
- Separate Kettle - In Part 3 of this series we will discuss Recirculating systems which use another brew kettle to act as the mash tun.
Wort Chilling - It is a lot harder to cool down 5 or more gallons of boiling wort than it was to cool down that 2-2.5 gallons, which was conveniently in a pot that would fit in your sink! Homebrewers are a pretty smart group of people and have come up with a handful of different ways to cool wort quickly. If you are going that 2.5 gallon batch route, you keep on doing what you been doing!
- No Chill - A method of cooling the wort by transferring it after the boil to a plastic fermenter that can withstand the heat. The brewer then lets the fermenter sit in the closed environment and pitches the yeast the next day when the wort has cooled down. This method will sanitize the fermentation vessel. $0 (assuming your vessel can accept 200+ degree wort).
- Immersion Chiller - A Copper Coil placed in the wort which has cold water run through it. Copper is a good conductor of heat. As the cold water runs through the copper coil, heat is transferred from the wort into the water inside the chiller. Hot water comes out of the chiller and your wort cools down. Immersion chillers work best when the wort is moving. This can be done by whirlpooling the wort with your brew spoon, or automtically like Jamil Zainasheff does. ~$70-$130 depending on size and if you employ DIY.
- Counter-flow Chiller - In this chiller there are two loops of liquid, one inside the other. A smaller diameter copper tube is housed inside a larger copper (or regular hose) tube. Wort is siphoned (gravity) or pumped through the smaller inner copper tube while cold water is run through and over the larger, outer tube. ~$50-$75+ for DIY and ~$200+ for buying from the store
- Plate Chiller - Wort is run between a series of conductive plates from one side, as cold water is run in between the plates from another. Similar to a counter flow as it requires movement of both wort and cooling water. I believe this also requires a pump to operate - may be possible through gravity. ~$100+
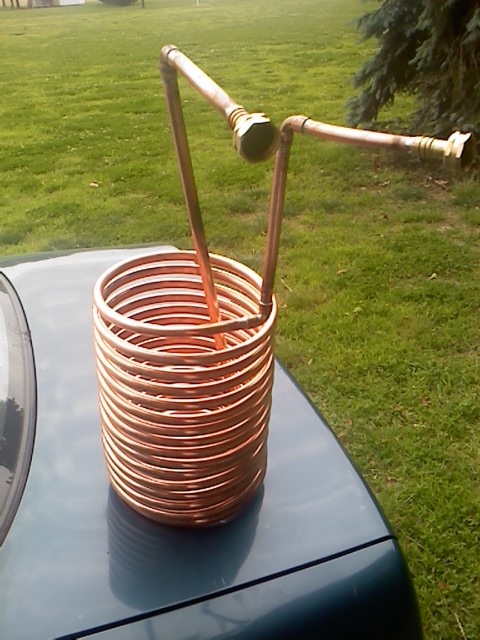
(Wort Chiller I made with about 40' of Copper and some Garden Hose Adapters)
Recap - So you now know that you need the following for items to move to all grain beer making:
- Larger Brewing Vessel
- Burner or Heatstick
- Mashing Vessel
- Way to cool the wort.
For the money conscious brewer, go out and get yourself a five dollar bag and make some 2.5 gallon batches! If you want to stick with 5 gallon batches, look to spend about $200-$250 to get into All Grain brewing. You can always buy bits and pieces here there until you have everything required to make the jump.
Going All Grain Series - Whats on Tap:
Part 3 - All Grain Wants
Going All Grain Series - Whats on Tap:
Part 3 - All Grain Wants
0 comments:
Post a Comment